How To Shoot A Basketball Better: Mastering the Perfect Shot
Are you tired of “airballs” or clanking the ball off the rim so hard that it seems like you’re trying to break the backboard? I still struggle with my shot after four decades plus of basketball. As a result, I am still doing the research and experimenting. I also have a 10-year-old son and coach his team and what to be able to do a better job teaching them all how to shoot a basketball.
One unusual resource I found was a chapter in Tim Ferriss’s book The Four Hour Chef, which confusingly is about learning quickly, about learning how to shoot a 3-point shot. He asked 30-year coach Rick Torbett, founder of Better Basketball, with a particular focus on shooting techniques, to teach him how to shoot (the link will take you to a transcript of a video with Tim and Rick walking through the process). I picked up several things (stepping into my shot was the most impactful for me).
In this post, I’ll reveal the secrets I found to developing the perfect basketball shot. Now following the secrets in a game situation is a whole other thing, but let’s look at the basics first. Fair warning, I am an alumnus of Creighton University and this will be peppered with references to two of the greatest 3-point shooters in CU Bluejay history (and the NBA), Kyle Korver, and Doug McDermott.
Key Fundamentals of Shooting a Basketball
Triple-Threat Position
The triple-threat position is your starting point once you receive the ball. This stance allows you to either shoot, pass, or dribble, keeping your defenders guessing. Just bend your knees slightly and align your feet shoulder-width apart. Make sure your dominant foot is slightly ahead like you’re facing an invisible opponent.
How To Hold A Basketball When Shooting
This section could also be called shooting and guide hand placement. Follow these guidelines to get the correct hand placement and grip on the basketball:
- Avoid Spreading Fingers Too Wide: Contrary to a common misconception, spreading your fingers as wide as possible is not the ideal way to grip a basketball. Instead, keep a relaxed grip on the ball.
- Don’t Shoot On Fingertips Alone: Another myth is that the ball should only be held with the fingertips. In reality, good shooters use their fingertips, finger pads, and thumb pads for better control and guidance. The ball doesn’t rest in the center of the palm, but most of the rest of the hand should be in contact with the ball.
- Proper Grip and Positioning: To get into a proper shooting position, one should find the horizontal seams of the ball and put the shooting hand on it in a relaxed manner. The hand should be in a widened position, similar to carrying a plate in a restaurant, with the wrist drawn back.
- The Guide Hand: The guide hand has a critical role in shooting. All four fingers and the thumb of the guiding hand should be pointing upwards and placed on the side of the ball.
- Setting the Ball in the Shot Pocket: After achieving the proper grip and hand positioning, the ball is ready to be set in the shot pocket, the place you put the ball before going into your shot motion (normally between your chin and your belly button).
Proper Shooting Mechanics
Bend and Extend
Shooting a basketball requires bending the knees and extending the arm. Start by bending your knees to generate power for the shot. I have always found I shoot better when I step into a shot with my knees bent. This will also help you keep your momentum going toward the basket. The arm extension will help you achieve a smooth, consistent shooting motion.
As you rise, extend your shooting arm fully and keep your elbow locked in under the ball.

Jump and Release
As you jump, release the ball at the apex of your jump to maximize your shot’s height and minimize the chances of having the shot blocked (although your jump is primarily to generate the power to get the ball to the hoop).
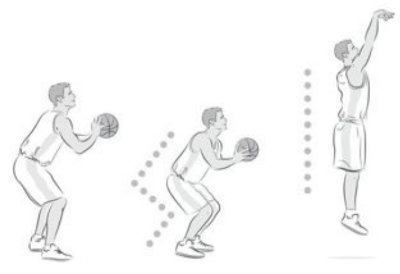
- Step In: After getting the ball ready and setting it in the shot chamber, the “fire” stage begins. At this stage, the entire body moves up and out towards the goal. There should be no negative motion, meaning the ball doesn’t dip or move away from the goal as it ascends.
- Power and Timing: A secret to achieving sufficient power and distance on a shot is timing the breaking of the wrist (the flicking motion for shooting) with the feet leaving the ground. This action helps engage the most explosive muscles in your body, your glutes, and channel the power up from your feet to the point of releasing the shot.
- Legs and Core for Power, Hands, and Arms for Guidance: The legs and core provide the power for the shot, while the hands and arms guide the ball. This means your arms and hands should be relaxed during shooting.
Follow-through and Wrist Snap
Never underestimate the power of a good follow-through. After releasing the ball, keep your shooting hand in the air and let your fingers point toward the basket as if you’re reaching for a cookie in a jar on a high shelf. Complete the motion with a wrist snap to give the ball a nice backspin to help guide it into the hoop if you hit some rim. In the video below, Torbett refers to it as the “Pose”.
Perfecting Shot Accuracy
Targeting the Basket
Before you let the ball fly, take a moment to visualize your target. Focus on a specific part of the hoop, like the back of the rim or the imaginary center. This mental exercise will help you calibrate your shot and improve your shooting aim.
In the video below Torbett talks about how to identify which of your eyes are dominant. Understanding this will give you an edge when you are lining up the basketball to shoot.
Arc and Trajectory
The arc and trajectory of your shot play crucial roles in determining whether you’ll hear the sweet sound of a swish or the crushing clang of a miss. To achieve the optimal trajectory, aim for a 45-55-degree arc. A higher arc increases the chances of the ball falling through the hoop. Experiment with different arcs to find your sweet spot. You can see in the video below that Kyle Korver’s shot is at least above the top of the backboard.
The steeper launch angle of Curry’s shot result in higher arc. Curry’s threes average a maximum height of 16.23 feet. The average maximum height of every other 3-pointer in the NBA this season is 15.77feet.
Wall Street Journal, Stephen Curry’s Science Of Sweet Shooting
Shooting Drills for Accuracy
As the saying goes, practice makes perfect. To improve your shot accuracy, engage in shooting drills that challenge you to shoot from various spots on the court. Consistent practice will help you develop muscle memory and fine-tune your shooting skills. I like to use basketball shooting spots to mark the court and gamify things to make drills more fun.
Developing a Quick Release
Catch-And-Shoot Technique
In the fast-paced world of basketball, every second counts. To keep up with the competition, you’ll need to develop a quick release. The catch-and-shoot technique is all about receiving a pass and launching your shot in one fluid motion. It’s like a game of hot potato, but with a basketball and a hoop. One of the things that Kyle Korver and Doug Mcdermott have in common is their ability to get their feet squared to the basket to take an on-balance shot with good form and a quick release. They need very little time and a great shooting it off the catch.
Off-the-Dribble Shooting
Sometimes, a quick catch-and-shoot isn’t an option. In those moments, you’ll need to channel your inner Stephen Curry and master the art of shooting off the dribble. Practice your footwork and learn how to create space between you and your defender before rising for the shot.
Overcoming Common Obstacles
In a game, you’ll face defensive pressure and various situations that can throw you off your shooting rhythm. To overcome these obstacles, practice shooting with defenders, simulate game situations, and learn how to adjust your shot on the fly. It’s all about adapting and staying one step ahead of your opponents. My biggest problem is remembering to step into a shot and keep my forward motion. Guys at the gym even comment on how I end up jumping to the side or even backward. Anything that causes negative motion will cause problems with your shot.
Even Kyle Korver, over the course of his NBA career, changed his shot from cocking the ball too far back. I watched a film session he did where he watched his own shot from his early NBA years to his later years with the Atlanta Hawks and he noticed how he now brings the ball up in front of his nose and releases rather than cocking it back like in his earlier years.
Learning from the Pros: Famous Basketball Shooters
Overview of Legendary Shooters
To become a sharpshooter, it’s essential to study the greats. Legends like Michael Jordan, Larry Bird, and Stephen Curry have all left their mark on the game with their exceptional shooting abilities. Analyze their techniques and learn from their successes and failures.

Analyzing Their Shooting Techniques
Each legendary shooter has a unique style. Dive into the nuances of their shooting mechanics, footwork, and release times. Take note of their consistency, accuracy, and ability to shoot under pressure. There’s a wealth of knowledge to be gained by observing these masters of the game.
Korver told Jeff Zillgitt of USA Today that he has a 20-point checklist of mechanics for his jumper. It includes basic principles like “Up strong,” “elbow straight,” “hold follow-through,” as well as more advanced ideas like “engage core,” “slight bend at waist,” “shoulders forward and relaxed.”
Conclusion Of How To Shoot A Basketball Properly
Mastering the perfect basketball shot is a journey, not a destination. By focusing on the key fundamentals, honing your mechanics, and practicing consistently, you’ll be well on your way to becoming a sharpshooter on the court. Remember, even the greats like Michael Jordan and Stephen Curry started with a single shot. So, pick up that basketball, head to the court, and gets your shots up, and let me know if you find additional helpful techniques on how to shoot a basketball.
Frequently Asked Questions
How can I improve my shooting accuracy in basketball?
To improve shooting accuracy, focus on proper shooting mechanics, visualize your target, and practice regularly with shooting drills. Consistent practice will help develop muscle memory and fine-tune your skills.
What is the role of the non-shooting hand in shooting a basketball?
The non-shooting hand, or off-hand, provides support and balance during the shot. It should guide the ball during the shooting motion but release it just before the shot is taken.
Why is follow-through important when shooting a basketball?
Follow-through is crucial because it helps maintain shot accuracy and consistency. A proper follow-through with a wrist snap gives the ball a smooth trajectory and backspin, increasing the chances of making the shot.
What is the optimal arc for shooting a basketball?
The optimal arc for shooting a basketball is typically between 45 and 55 degrees. A higher arc increases the chances of the ball falling through the hoop, while a lower arc makes it harder for defenders to block the shot.
How can I develop a quick release when shooting a basketball?
To develop a quick release, practice catch-and-shoot techniques, and off-the-dribble shooting. Focus on footwork, timing, and releasing the ball at the apex of your jump to make your shot more difficult for defenders to block.


Troy Wallace
Troy Wallace is Certified Basketball Speed Specialist and shares his experiences in trying to stay as healthy as possible to stay on the court. He is active in coaching youth basketball in YMCA, Team Work Sports Nebraska, and, currently, in the Jr. Warriors program in Omaha, NE. Visit Troy's Full Author Bio Page or email him directly.
Meaningful conversations happening daily about training, recovery, and injury-specific rehabilitation as well as sport-specific discussions on playing, coaching and refereeing your favorite sport. We welcome experts and those with curious minds seeking answers.
Join The Stay On The Court Community!